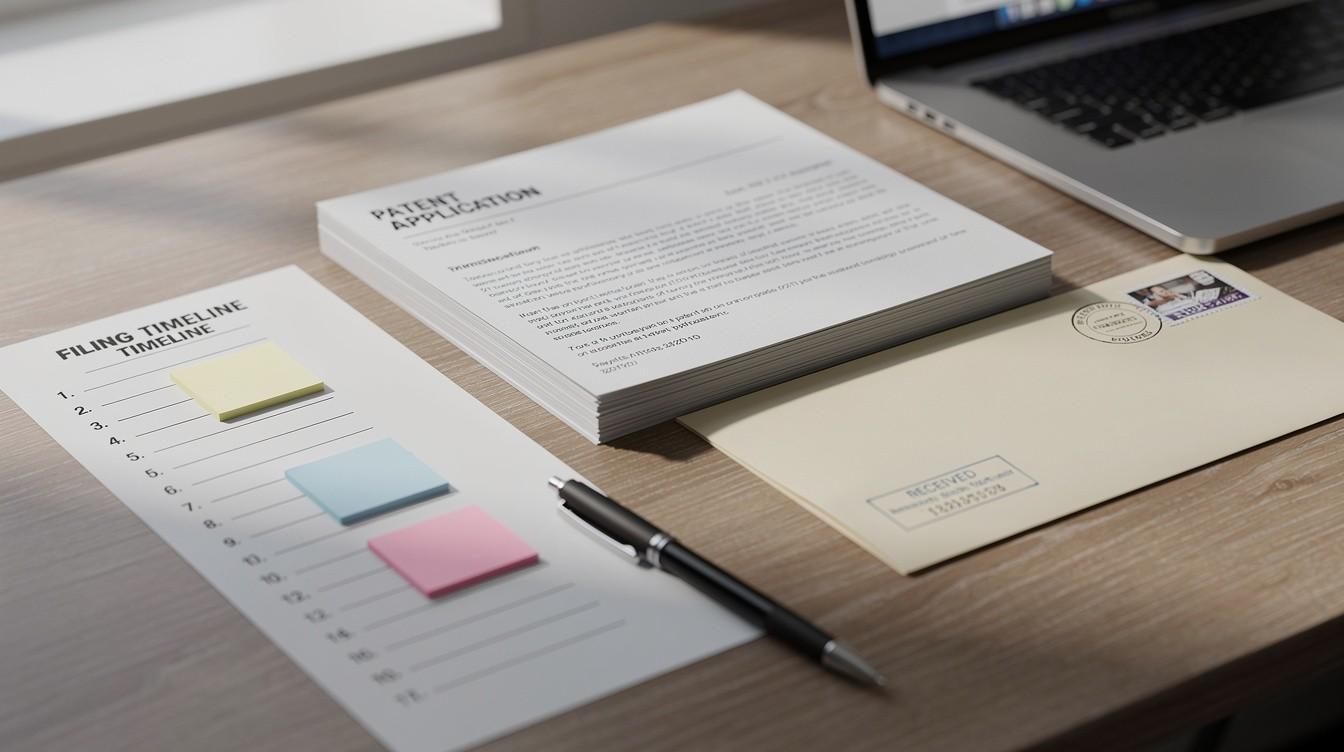
US Patent Filing Steps: A Practical Timeline
Filing a patent with the US Patent and Trademark Office involves multiple stages, each with specific requirements and timelines. The process can take years, but understanding the US patent filing steps helps you prepare properly and avoid costly delays.
At Daniel Law Offices, P.A., we guide inventors through each phase-from evaluating whether your invention qualifies for protection through final approval. This guide breaks down the timeline so you know what to expect at every stage.
Does Your Invention Actually Qualify for a Patent?
The Three Hard Requirements for Patentability
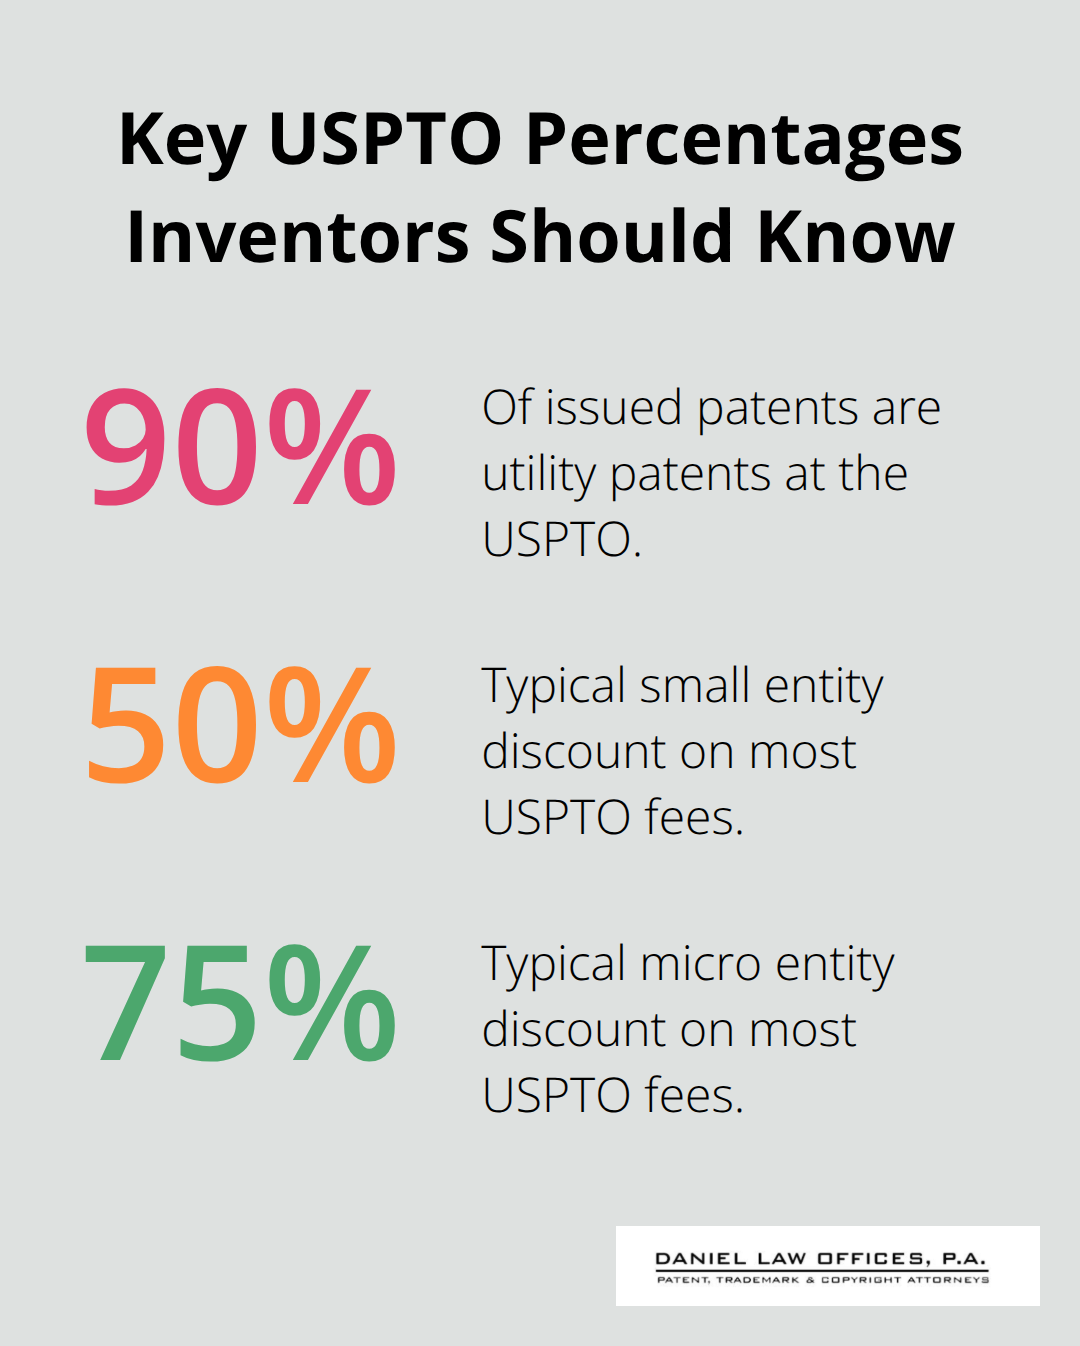
Not every invention deserves patent protection, and filing for something that won’t pass USPTO scrutiny wastes money and time. The USPTO receives over 600,000 patent applications annually, but about 90% of issued patents are utility patents, meaning design and plant patents represent a much smaller slice of successful filings.
Before you spend thousands on drafting and prosecution, you need to know if your invention meets three hard requirements: it must be novel, useful, and non-obvious.
Novelty means no one has publicly described your invention in a patent, printed publication, or prior art before your filing date. Usefulness means your invention actually does something functional. Non-obviousness is the toughest hurdle-a person skilled in your industry must not find it obvious to combine existing references to arrive at your invention.
Searching for Prior Art Before You File
The USPTO’s Patent Public Search tool lets you hunt for similar inventions and understand what’s already out there, but this search demands serious time investment. Many inventors skip this step thinking they’ll figure it out later, then face rejections that could have been predicted. Conducting a thorough prior art search before filing prevents wasted effort because once your application publishes 18 months after filing, your invention details become public regardless of approval status.
Your search should focus on issued patents, applications, academic papers, and commercial products in your field. The USPTO’s Patent Public Search is free, but interpreting results requires knowing how patent claims work and what prior art actually kills your chances.
The Provisional Application Strategy
Filing a provisional application first costs far less than a full utility filing and gives you 12 months to evaluate commercial potential. A provisional establishes an official US filing date and allows you to use “Patent Pending” on your invention. However, a provisional is never examined, so you must file a corresponding nonprovisional within 12 months to preserve those rights. Many inventors use provisionals strategically to test the market before committing to full prosecution costs.
Moving Forward with Confidence
If your search reveals nothing blocking your path and your invention genuinely solves a problem better than existing solutions, you have a solid foundation to proceed. If you uncover close competitors or similar patents, reassess whether your invention offers a meaningful improvement that the USPTO will view as non-obvious. Once you’ve confirmed patentability, the next phase involves gathering the technical documentation and drawings that form the backbone of your actual patent application.
Building Your Patent Application in Orlando, Florida
Your prior art search confirmed patentability, but now comes the phase where vague ideas transform into a legally binding document the USPTO will examine. This phase demands precision because the specification you file becomes the foundation for everything that follows.
Understanding USPTO Requirements for Your Application
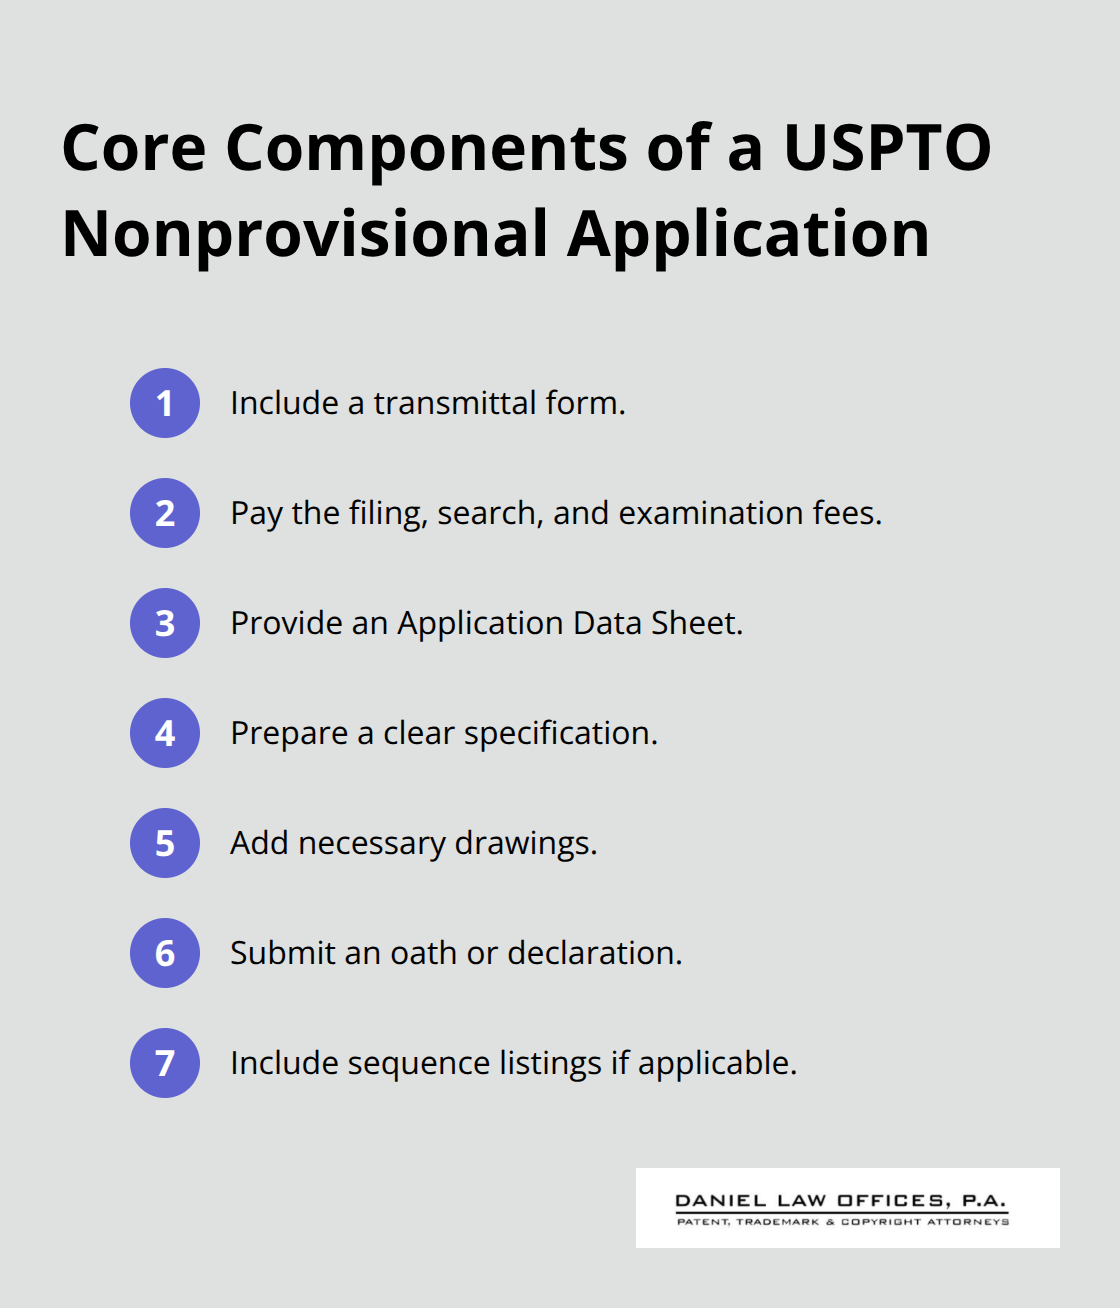
The USPTO requires specific components in every nonprovisional utility patent application: a transmittal form, filing fees, an Application Data Sheet, the specification itself, drawings if necessary to understand the invention, an oath or declaration, and any sequence listings if applicable. The specification must include a title, cross-references to related applications, background information, a brief summary, a description of drawings, a detailed description of the invention, numbered claims, and an abstract.
Your written description must be clear enough that someone skilled in your field could reproduce the invention without further experimentation. The USPTO specifies exact formatting requirements: pages must be 8.5 by 11 inches or DIN A4, with 1.5 or double spacing, one-inch margins, and numbered pages starting at 1. No script fonts are permitted. If your invention received government funding, you must include a statement acknowledging the government’s rights.
Drafting Claims That Protect Your Invention
Claims define exactly what your patent protects, and they must be single sentences, numbered consecutively, and begin on a separate page. A dependent claim must reference at least one preceding claim and cannot broaden it. Most inventors struggle with claim drafting because it requires understanding both your invention’s technical details and patent law language simultaneously. The specification you write supports these claims, so precision in both sections matters enormously.
Creating Drawings That Meet USPTO Standards
Drawings serve a specific purpose-they must show every feature necessary to understand the invention, use black-and-white lines with specified thickness, include legible reference numerals, and display proper margins and sheet numbering. Color drawings are generally not allowed without a petition and additional fee. The first drawing becomes your cover-page figure and should clearly represent your invention for publication purposes.
Filing Electronically Through Patent Center
Patent Center is the mandatory filing system, and you must submit your specification and drawings in DOCX format beginning January 17, 2024. Filing in any other format triggers a $430 surcharge for standard entities, reduced to $172 for small entities and $86 for micro entities. Pay all fees at filing time to avoid a $170 late surcharge. Electronic filing eliminates the $400 non-electronic filing surcharge, provides real-time payment processing, and gives you immediate confirmation of receipt.
Completing Your Oath or Declaration and Fee Structure
An oath or declaration is required, typically using form PTO/AIA/01 or PTO/AIA/02, confirming you are the true inventor. If you’re not the sole inventor, all inventors must be named and sign the declaration. This is where many business founders encounter problems-if your employees developed the invention, they must sign the oath even though your company will own the patent rights through assignment. The complete filing fee for a nonprovisional utility patent from a standard entity includes a base filing fee plus separate search and examination fees. Small entities and micro entities receive substantial discounts-typically 50% for small entities and 75% for micro entities on most fees. Determine your eligibility before filing because claiming a discount you don’t qualify for creates serious problems during prosecution. If you’re converting a provisional application to a nonprovisional within 12 months, include a reference to the provisional in your Application Data Sheet to preserve your earlier filing date, though conversion affects the priority date calculation for any future international filings. Once you submit your complete application with all required components and correct fees, the USPTO assigns your application to a patent examiner who will begin reviewing it for legal requirements and patentability.
Navigating the Patent Prosecution Process
After you submit your complete application to the USPTO, a patent examiner is assigned to review it within a few months. The examiner will conduct a prior art search using the same databases you should have already searched and will issue an office action within 6 to 12 months, though this timeline varies based on the technology field and current USPTO workload. An office action is the examiner’s written response to your application, and it will either allow your patent, reject some or all claims, or request clarification on specific aspects of your invention.
Understanding Office Actions and Rejections
Most applications receive at least one rejection on the first office action because examiners take a restrictive view initially, citing prior art patents or publications they believe make your invention obvious or lacking novelty. This is not a disaster-it is standard patent prosecution. The USPTO data shows that persistence through office actions is normal, and inventors who respond strategically often secure patents that initial rejections seemed to threaten.
You have three months to respond to any office action, though you can request a one-month extension for a fee, or longer extensions at increasing cost. Your response strategy depends on the examiner’s specific objections. If the examiner cites prior art that you believe is distinguishable from your invention, write a detailed argument explaining why your claims are patentable despite that prior art. If the examiner rejects claims as obvious under 35 U.S.C. Section 103, argue that combining the cited references would not have been obvious to someone skilled in your field, or amend your claims to narrow their scope and avoid the rejection.
Amending Claims and Strategic Responses
Amending claims is powerful but risky-narrower claims are easier to allow but provide weaker protection after grant. Many inventors file responses without understanding that claim amendments permanently limit what their patent covers, so consider whether the narrower scope still protects your core invention. The specification you wrote supports these claims, and any amendments must remain consistent with your original written description.
Requesting an Examiner Interview
If an office action is complex or the examiner’s reasoning seems unclear, request an examiner interview through Patent Center. The interview happens via video or phone and typically lasts 30 minutes. During the call, you can directly discuss the examiner’s concerns, propose claim amendments, and understand their priorities for allowance. The USPTO reports that many applicants find interviews resolve issues faster than written responses alone because examiners often explain their thinking more fully in conversation.
If you have a registered patent attorney representing you, the examiner communicates only with your attorney, not directly with you. This arrangement is actually beneficial because a qualified attorney knows how to frame arguments and propose amendments that align with the examiner’s stated concerns. At Daniel Law Offices, P.A., we conduct these interviews to accelerate allowance and secure the strongest possible claims for our clients.
Handling Final Rejections and Appeals
If your first response does not result in allowance and the examiner issues a final rejection, you face a critical decision. A final rejection means the examiner believes the issues cannot be overcome with further amendments or arguments. You can file a continued examination request, which costs a substantial fee and restarts the prosecution clock, or you can appeal the rejection to the Patent Trial and Appeal Board within the USPTO. Appeals require detailed legal briefs and cost several thousand dollars, so most inventors choose continued examination to revise their strategy or narrow claims further.
If any claim has been rejected twice-once in a non-final office action and again in a final rejection-you are eligible to appeal, which is your last resort before abandoning the application. The Patent Trial and Appeal Board will review your case based on the written record, and the board’s decision determines whether your patent moves forward to allowance or whether you must abandon your application.
Final Thoughts
The US patent filing steps span months or years, and understanding the timeline prevents surprises that derail inventors. From your initial prior art search through final allowance, you encounter specific milestones that mark progress. Filing a provisional application establishes your priority date within weeks, while converting to a nonprovisional or filing directly triggers the 18-month publication clock, after which your invention becomes public regardless of approval status. Your first office action typically arrives 6 to 12 months after filing, depending on your technology field and current USPTO workload.
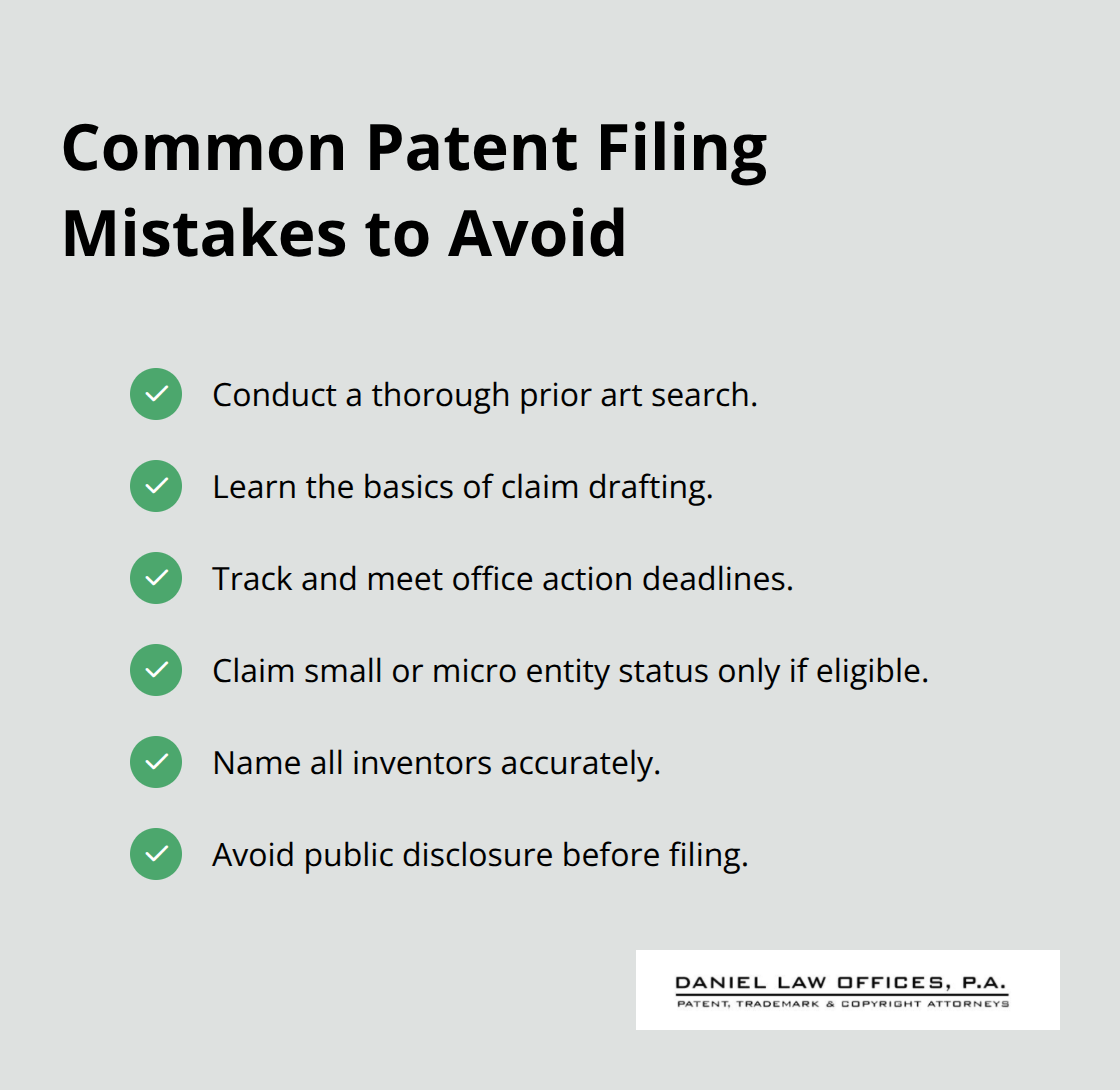
Common mistakes cost inventors thousands in wasted effort. Skipping the prior art search leads to rejections that could have been predicted, while filing without understanding claim drafting results in patents that protect far less than intended. Missing response deadlines to office actions abandons your application entirely, and claiming small-entity or micro-entity discounts without qualifying creates serious prosecution problems. Failing to name all inventors in your oath or declaration invalidates the entire patent after grant, and disclosing your invention publicly before filing destroys US patent rights under the first-to-file system (which took effect in 2013).
The complexity of US patent filing steps makes professional guidance valuable. We at Daniel Law Offices, P.A. guide inventors through each phase, from evaluating patentability through final approval and beyond. Contact us today to discuss your invention and determine the right protection strategy for your situation.