Mastering Patent Application Process Steps: A Startup’s Practical Guide
Getting a patent filed shouldn’t feel like navigating a maze. Most startups in Orlando, Florida and beyond struggle with the patent application process steps because the requirements seem overwhelming at first glance.
We at Daniel Law Offices, P.A. have guided hundreds of founders through this journey, and we know what actually works. This guide breaks down each phase into actionable steps you can follow.
Is Your Invention Actually Patentable?
Not every invention qualifies for patent protection, and that’s the first reality you need to understand. The USPTO rejects roughly 46% of utility patent applications, and a significant portion of those rejections stem from patentability issues discovered early in the process. Three fundamental requirements determine whether your invention can be patented: novelty, non-obviousness, and utility. Novelty means no single prior art reference can disclose your entire invention before your filing date. Non-obviousness requires that your invention represents an unexpected technical advance-something a person skilled in your field wouldn’t naturally arrive at. Utility simply means your invention must have practical usefulness. Most startups stumble here. You might have a functional product, but if similar solutions already exist in patents, published applications, or obscure technical literature, the USPTO will reject your application. The grace period in the United States gives you one year after public disclosure to file, but this creates a false sense of security. Most foreign jurisdictions require absolute novelty, meaning any public disclosure before filing kills your international protection. If you plan global expansion, filing before any disclosure becomes non-negotiable.
The Three Patentability Requirements
Novelty demands that your invention differs from everything that came before it. A single prior art reference that discloses all elements of your invention defeats novelty, and the USPTO examiner will find it. Non-obviousness goes further-your invention must represent a leap that wouldn’t occur to someone already working in your field. This requirement separates truly innovative solutions from incremental improvements. Utility requires practical usefulness; your invention must solve a real problem or provide a real benefit. These three requirements work together, and failing any one of them results in rejection.
Why Prior Art Searches Matter Before Filing
A comprehensive prior art search costs between $1,000 and $3,000, and it represents the most important investment you’ll make before filing. This search reveals what the USPTO will find anyway, but conducting it first allows you to make informed decisions about claim scope and whether to proceed at all. The search should cover USPTO patent databases, Espacenet for European patents, and Patentscope for international filings, plus non-patent literature and code repositories if your invention involves software. Treat this search as your competitive intelligence tool, not just a legal checkbox.
When examiners review your application, they typically search U.S. patents, published applications, and non-patent literature. The USPTO organizes examiners into Technology Centers-meaning your invention gets reviewed by someone familiar with your specific field. Understanding which Technology Center handles your invention helps you anticipate what prior art the examiner will cite. Professional prior art searches improve approval chances by roughly 10% compared to applications filed without thorough searches, according to USPTO data.
Software and Complex Inventions Require Deeper Searches
If your invention involves software, hardware, or a combination, the search becomes more complex because your claims might intersect with multiple technology areas. Code repositories, academic papers, and open-source projects all count as prior art that examiners will consider. Inadequate searches lead to applications that seem strong initially but collapse under examination when unexpected references surface. The interdisciplinary nature of modern inventions means you cannot rely on a surface-level search.
With your patentability assessment complete and prior art mapped, you’re ready to move into the preparation phase. Understanding what makes your invention unique positions you to document it properly and file an application that withstands examination.
Turning Your Invention Into a Fiable Patent Application
Documentation makes or breaks your patent application, and most startups treat this phase like an afterthought. The USPTO receives roughly 430,000 utility patent applications annually, but the ones that sail through examination share one quality: clear, comprehensive specifications that leave no room for interpretation. Your specification is the foundation of your entire patent.
Write Specifications That Withstand Examination
Your specification must describe your invention’s purpose, structure, function, and how it differs from prior art. Include multiple embodiments to show different ways your invention can work, because this breadth protects you against narrow interpretations during examination. A specification lacking sufficient detail invites rejections based on inadequate enablement-meaning the examiner decides a person skilled in your field cannot make and use your invention without undue experimentation.
About 15% of patent invalidations in litigation stem from inadequate enablement or failure to disclose the best mode. This means poor documentation today becomes a liability years later if you ever need to enforce your patent. Your specification should address edge cases and variations your invention can handle, because examiners will test your claims against every possible interpretation.
Create Drawings That Support Your Claims
Your drawings matter just as much as your written description. Include multiple views, label every component consistently, and treat drawings as part of your enforcement strategy-they become public record and help others understand your invention’s scope. Well-drafted claims reduce initial rejections by roughly 25%, while high-quality drawings increase approval rates by about 20%.
Choose Between Provisional and Non-Provisional Filing
Filing your application requires choosing between provisional and non-provisional paths, and this decision depends entirely on your timeline and resources. A provisional application establishes an early priority date for just $320 in filing fees for large entities, without requiring formal claims or extensive documentation-you file what you have, and the 12-month clock starts.
About 149,000 provisional applications were filed in 2023, reflecting how startups use this route to claim patent-pending status while iterating on their product. If you go provisional, you must file a non-provisional within those 12 months to preserve your priority date and pursue actual patent rights.
Understand Non-Provisional Application Costs and Requirements
The non-provisional application costs more upfront and demands complete specifications, formal claims, and an abstract under 150 words. Professional preparation of a non-provisional utility application typically ranges from $10,000 to $20,000 depending on complexity, though total costs over the prosecution period often reach $8,000 to $25,000 including office action responses.
Electronic filing through the USPTO Patent Center is 15% faster than paper filing and avoids a $400 non-electronic surcharge. Try going non-provisional directly if your invention is already documented and you need patent rights quickly, or provisional if you’re still refining your product and want to establish an early filing date affordably.
Navigate the Filing Decision
The choice between provisional and non-provisional hinges on whether speed or cost matters more in your immediate situation. Once you file, the USPTO begins its examination process, and your responses to office actions will determine whether your patent issues or faces rejection.
What Happens After You File Your Patent Application
After filing, the USPTO assigns your application a number and begins its examination process, which typically takes 16 to 20 months before you receive your first Office Action. This waiting period feels passive, but examiners actively search prior art databases, compare your claims against existing patents and publications, and build their case for rejection or allowance. According to the USPTO, over 92% of applications receive at least one rejection, so expect an Office Action that requires a response. When that Office Action arrives, it will cite prior art references the examiner found and explain why your claims fail novelty, non-obviousness, or subject matter eligibility.
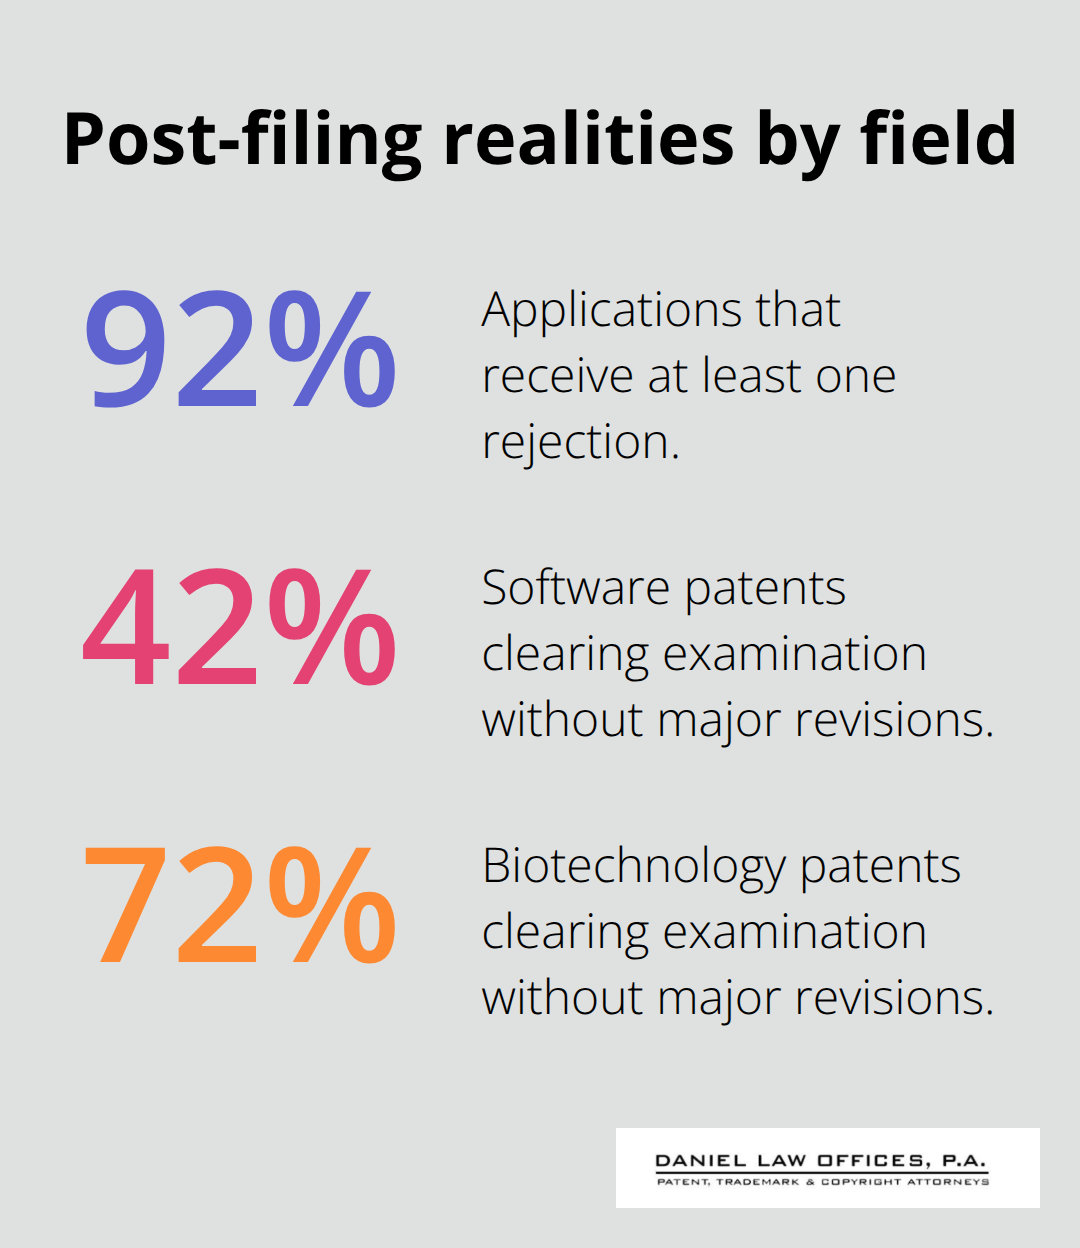
The examiner works in a specific Technology Center organized by field, meaning your software patent goes to someone familiar with software, and your mechanical invention to someone who understands mechanical systems. This matters because different fields have different allowance rates-software patents historically clear examination at roughly 42% without major revisions, while biotechnology sits around 72%, giving you a sense of how much headwind your field faces.
Decode Your Office Action and Plan Your Response
When your Office Action lands, read it carefully because examiners structure rejections predictably. Most cite 35 U.S.C. 102 for lack of novelty, 103 for obviousness, or 101 for ineligible subject matter, especially if your invention involves software or artificial intelligence. You have three months to respond, though you can request a one-month extension for a modest fee. Your response strategy determines whether you move toward allowance or waste cycles on weak arguments. Three primary tactics work best: amend your claims to narrow them away from the cited prior art, present persuasive arguments explaining why the examiner’s rejection misinterprets your invention, or request an examiner interview to discuss the application directly. Claim amendments work best when you can genuinely differentiate your invention from what the examiner cited-for instance, adding a specific technical feature that wasn’t disclosed in the prior art reference. Persuasive arguments succeed when you can show the examiner applied the wrong legal standard or misread a reference, but generic arguments about your invention’s commercial value rarely move examiners. Examiner interviews, conducted by phone or video, often resolve disputes faster than written responses because you can ask clarifying questions and hear the examiner’s actual concerns rather than guessing from their written rejection.
Accelerate Your Patent Grant or Accept Extended Timelines
The standard examination timeline stretches 23 to 24 months for straightforward cases and often exceeds 30 months for complex applications, particularly given the USPTO backlog of roughly 1.2 million pending applications. If your market window is tight, the Track One Prioritized Examination program delivers final disposition within approximately 12 months for an additional fee, which currently runs $2,000 for large entities. This acceleration matters for startups raising capital-investors often value companies with granted patents higher than those with pending applications. Alternatively, the Patent Prosecution Highway program lets you leverage examination results from foreign patent offices to accelerate your U.S. case, though this requires coordinating international filings. Most startups simply accept the extended timeline and manage cash flow accordingly. If your application receives a final rejection after your first response, you have three paths: file a Continuation application that starts examination fresh with modified claims, request Continued Examination to respond again with new arguments, or appeal to the Patent Trial and Appeal Board if you believe the examiner made a legal error. About 12% of applications are abandoned after the first Office Action, usually because inventors decide the invention no longer matters or costs have spiraled. Once your examiner issues an Allowance, you must pay the issue fee within three months-currently $1,290 for large entities, $516 for small entities, and $258 for micro entities-to secure your patent grant.
Final Thoughts
The patent application process steps you’ve learned here represent a roadmap that transforms your invention into enforceable legal protection. Startups that succeed with patents treat the process as a business investment rather than a legal formality, and they invest in patentability assessment and prior art searches before filing, not after rejection arrives. Spending $1,000 to $3,000 on a comprehensive search prevents you from filing weak applications that waste months and thousands in prosecution costs.
When you file, choose provisional or non-provisional based on your timeline and product maturity, not on cost alone. A provisional application buys you 12 months to refine your invention while establishing an early priority date, but only if you follow through with a non-provisional filing within that window. Once examination begins, expect an Office Action within 16 to 20 months, and plan your response strategy around claim amendments and persuasive arguments rather than hoping the examiner overlooked something.
We at Daniel Law Offices, P.A. guide startups through every phase of patent prosecution, from initial patentability assessment through grant and beyond. Our registered patent attorney helps you navigate USPTO requirements, respond strategically to Office Actions, and build patent portfolios aligned with your business goals. Contact us to discuss your invention and learn how we can protect your intellectual property.