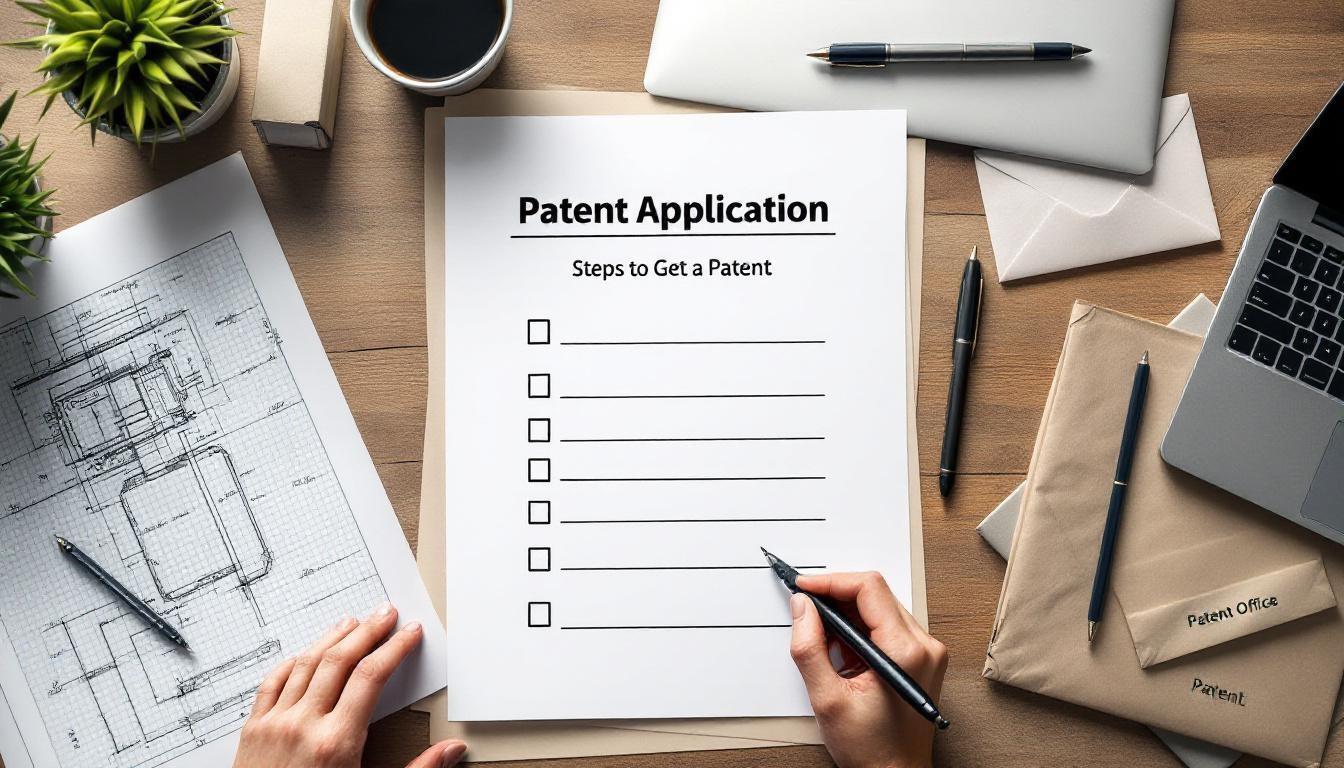
How to Get a Patent: Essential Steps Guide
Getting a patent protects your invention and gives you exclusive rights to profit from it. The steps in getting a patent can seem overwhelming, but breaking them down makes the process manageable.
At Daniel Law Offices, P.A., we guide inventors through each stage-from evaluating patentability to navigating USPTO examination. This guide walks you through what you need to know.
Is Your Invention Actually Patentable
Before filing anything with the USPTO, you need to answer a hard question: does your invention meet the basic requirements for patent protection? The USPTO receives over 600,000 patent applications annually, and a significant portion face rejection during examination. Starting with a clear assessment of patentability saves you thousands in filing and attorney fees down the road.
The Three Core Elements of Patentability
Patentability hinges on three core elements. Your invention must be novel, meaning it cannot already exist in public records or prior patents. It must be non-obvious, which means it cannot be a simple combination of existing technologies that someone skilled in your field would naturally think to combine. Finally, it must fall within patentable subject matter-utility patents cover processes, machines, manufactures, or compositions of matter, while design patents protect ornamental designs and plant patents cover new plant varieties.
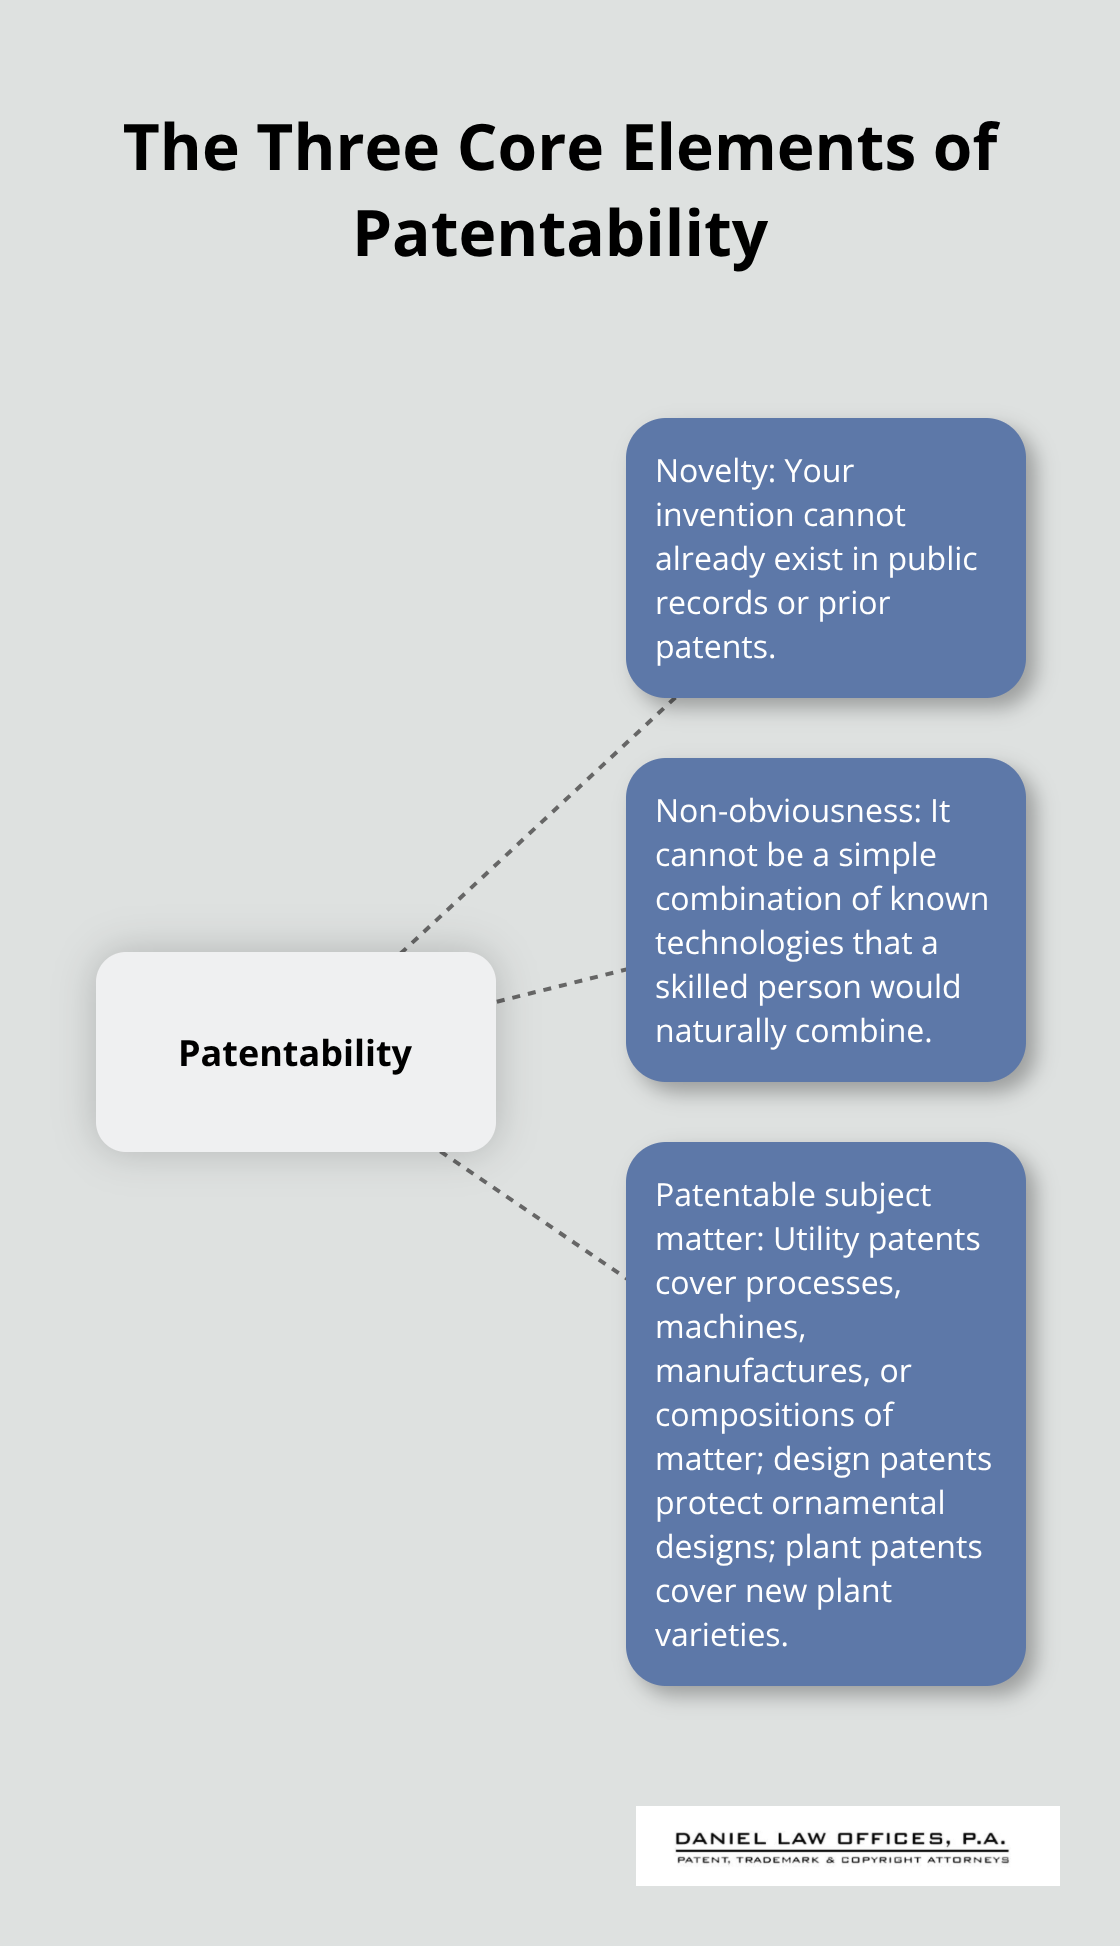
The USPTO explicitly excludes laws of nature, abstract ideas, and mere ideas from patent protection, so a concept alone will not qualify.
Conduct a Prior Art Search
Your first move should involve conducting a prior art search across the USPTO patent database and scientific literature. This search reveals whether your invention already exists, whether similar inventions have been filed, and how your idea compares to what came before. Many inventors skip this step and later discover their invention was already patented five years ago.
Search the USPTO Patent Center using classification codes related to your field-these CPC codes pinpoint exactly where similar inventions live in the patent system. If your invention appears in existing patents or published applications, you still have options. You can design around the existing patent by modifying your invention to avoid infringing claims, or you can pursue a narrower patent that covers a specific aspect of your innovation.
Document Your Invention Thoroughly
Document everything about your invention during this assessment phase-technical specifications, drawings, development timelines, and problems your invention solves. This documentation becomes critical when writing your patent application and helps you articulate why your invention is truly novel and non-obvious. A comprehensive prior art search combined with solid documentation positions you to move forward with confidence into the application preparation stage.
Building Your Patent Application
Now that you’ve confirmed your invention is patentable, the real work begins. You need to transform your technical knowledge into a formal application that meets USPTO standards and withstands examiner scrutiny. Most inventors underestimate this phase, which typically costs between $5,000 and $15,000 depending on complexity. The difference between a weak application and a strong one often determines whether you get a patent or a rejection notice.
Organize Your Technical Documentation
Start by organizing every technical document you’ve created. Gather schematics, prototypes, test results, engineering calculations, and any materials that show how your invention works. Your patent drawings are not decorative-they must correspond directly to elements described in your specification and use consistent reference numbers throughout. For mechanical inventions, include exploded views showing component relationships. For software or business methods, flowcharts are essential.
The USPTO requires drawings in black and white with specific line weights and formatting, so if you cannot produce publication-quality drawings yourself, hire a professional patent illustrator. This typically costs $500 to $2,000 but prevents costly delays during examination.
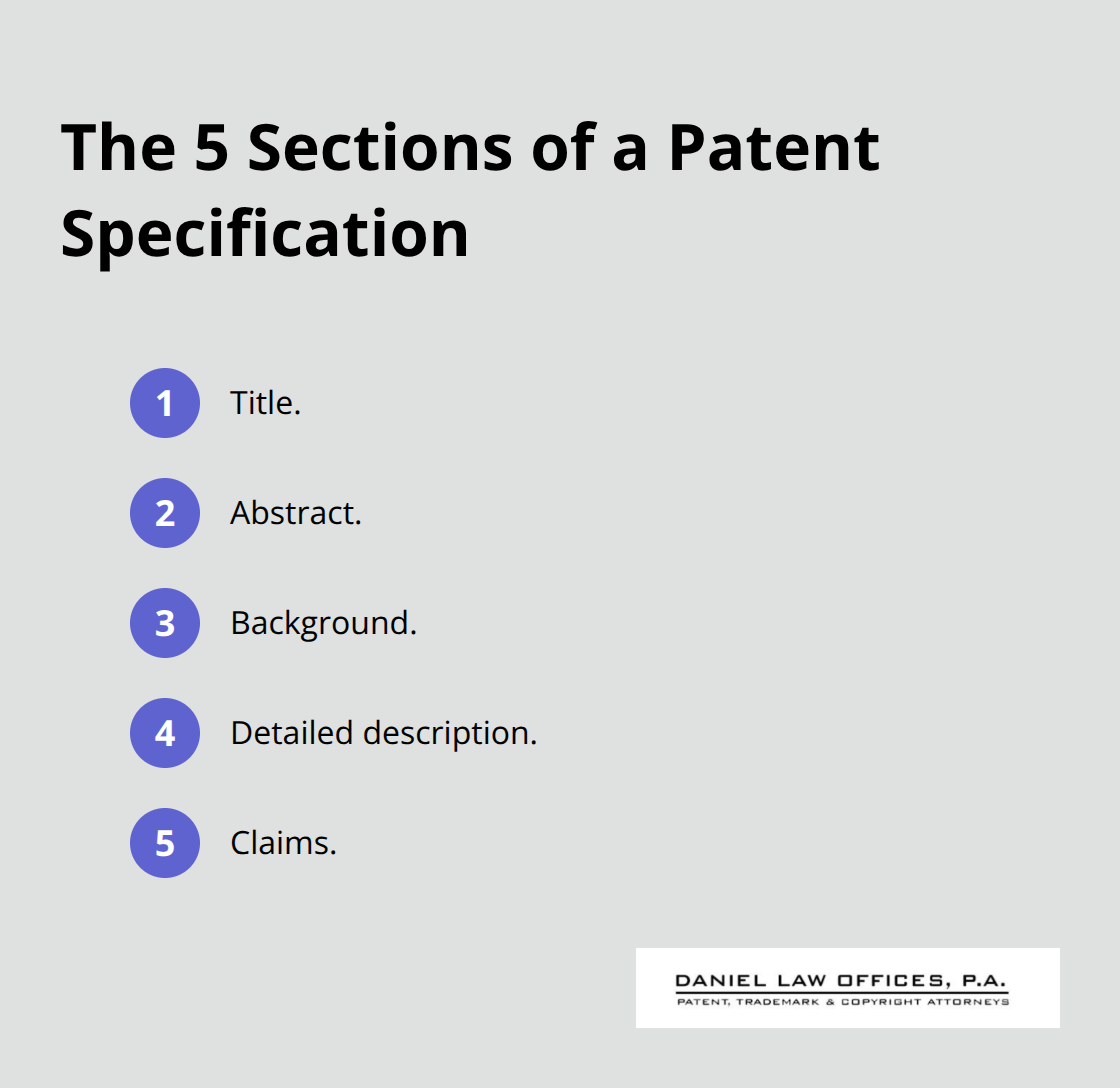
Write Your Patent Specification With Precision
Next, write your patent specification with ruthless clarity. The specification has five sections: the title, abstract, background, detailed description, and claims. Your detailed description must be thorough enough that someone skilled in your field could build your invention from your written words alone-this is called the enablement requirement.
The more broadly you want to claim protection, the more comprehensively you must describe how your invention works.
Include concrete examples and multiple embodiments rather than vague generalizations. Avoid marketing language and focus on technical accuracy. This foundation determines how well your claims hold up during examination and enforcement.
Draft Claims That Protect Your Invention
Your claims define exactly what you own legally, so draft them carefully. Start with independent claims that stand alone, then add dependent claims that narrow the scope. This gives you fallback positions if the examiner rejects your broader claims. Most inventors benefit from having an attorney review claims before filing, since claim language is highly technical and mistakes are difficult to fix later.
File Your Application With the USPTO
File through the USPTO Patent Center online-this is mandatory for all filings as of 2024 and costs less than paper filing. You’ll need an active USPTO.gov account with identity verification completed before submission. The filing fee for a utility patent is $320 for a large entity, though small entities and micro entities pay reduced amounts.
Your application must include a completed Application Data Sheet, which provides metadata like inventor names, filing type (provisional versus nonprovisional), and correspondence details. Submit everything in DOCX format to avoid additional surcharges. After filing, the USPTO issues an official filing date, which becomes critical-it establishes your priority date and triggers the 20-year protection period.
What Happens After You File
You’ll receive a filing receipt within days, and the patent office begins its own prior art search. This examination phase will test whether your application meets USPTO standards and whether your claims truly protect what you’ve invented. How you respond to the examiner’s findings over the coming months will largely determine your success.
Navigate the Patent Examination Process
Understand What Office Actions Mean
The USPTO examiner will issue an Office Action within three to six months of your filing, and this is where most patent applications face their first real test. Office Actions cite rejections based on prior art, lack of novelty, obviousness, or insufficient disclosure in your specification. The examiner searches databases you may have missed and finds references you didn’t know existed. This feels discouraging, but Office Actions are standard practice-the vast majority of patents are rejected at least once before allowance. Your response determines whether you move forward or abandon the application.
Respond Within the Required Timeframe
The USPTO gives you three to six months to respond, and missing this deadline results in abandonment, so mark your calendar immediately upon receiving an Office Action. Do not ignore it or assume the examiner made an error. Instead, analyze each rejection point by point. If the examiner cites a prior art patent that seems relevant, study it carefully-read the claims first, not the title or abstract, since claims define what the prior art actually covers. Often, the cited reference does not actually cover your invention’s core function. Build your response around this distinction.
Use Three Primary Response Tools
Your response has three primary tools: amend your claims to narrow their scope and avoid the cited prior art, submit technical arguments explaining why the examiner’s rejection is legally or factually incorrect, or provide declarations from technical professionals supporting your invention’s non-obviousness. Most inventors find that narrowing claims works best initially-remove broad language and add specific limitations that distinguish your invention from what came before. This gives you a fallback position while keeping some protection intact.
Handle Final Office Actions Strategically
If you receive a final Office Action after your first response, you face a critical decision. You can file a Request for Continued Examination (RCE) to continue prosecution with new arguments or amendments, or you can appeal to the Patent Trial and Appeal Board (PTAB). An RCE costs $2,000 to $3,000 in office fees alone and typically extends prosecution by another year, but it often succeeds where arguments alone fail. Appeals to the PTAB are more expensive and time-consuming, usually costing $5,000 to $15,000 in attorney fees, but they preserve your original broader claims if you win.
Most inventors lack the resources or patience for prolonged prosecution, so many applications lapse unnecessarily. Respond promptly to each Office Action, provide thorough arguments, and consider professional guidance from a registered patent attorney who can navigate examiner interactions and maximize your chances of approval. A registered patent attorney can help you decide whether an RCE or appeal makes sense for your specific situation.
Final Thoughts
The steps in getting a patent demand patience, precision, and strategic decisions at every turn. Expect twelve to thirty-six months from filing to grant, depending on your invention’s complexity and how quickly you respond to examiner feedback. Costs range from $5,000 to $15,000 when working with a registered patent attorney, plus USPTO filing and examination fees totaling around $1,000 to $2,000, with additional expenses if rejections require multiple responses or a Request for Continued Examination.
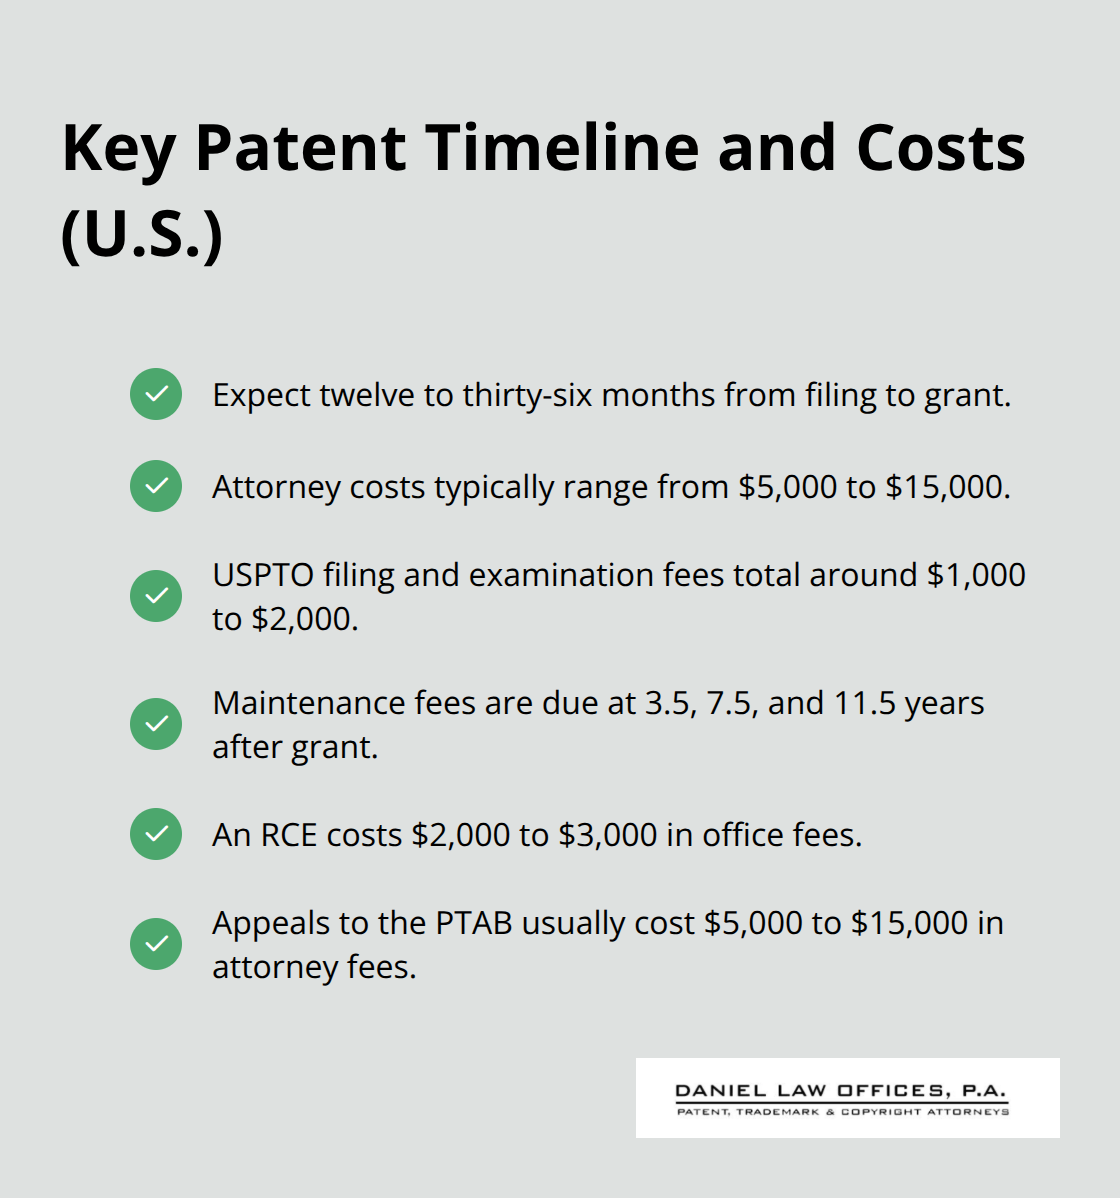
If the USPTO grants your patent, maintenance fees come due at 3.5, 7.5, and 11.5 years after grant-missing these deadlines causes your patent to lapse and lose enforceability. Rejections do not mean failure; a Request for Continued Examination lets you respond with new arguments or narrower claims for $2,000 to $3,000 in office fees, while appeals to the Patent Trial and Appeal Board preserve your original claims but cost significantly more in attorney fees. Inventors who conduct solid prior art searches, write clear specifications, and engage professional guidance during examination succeed far more often than those who cut corners.
We at Daniel Law Offices, P.A. guide clients through comprehensive patent strategy and prosecution to maximize approval odds and protect your innovation effectively. Contact us to discuss how we can help you navigate the patent process and turn your invention into protected intellectual property.